
So, I confiscated an old pie safe from my parents' house a few weekends ago. I'm getting a major urge to redecorate, but to alleviate a massive stroke on my husband's behalf, it does not involve any major purchases or much elbow grease on his behalf. I should get extra points for that!
This was really one of the easiest projects I've tackled...and for the biggest impact! Although it's a three-day project, just a few hours each day will get you completely done. Love that!
Here's what you need to make your own creation:
-A signature piece of wooden furniture/frame
-Quart of Oil-based primer
-Quart of Paint (be brave!)
-A hand sander
-Sandpaper or steel wool
-Hardware as needed (new knobs, pulls, etc.)
Like I said earlier, visit your nearest antique store and let your imagination run wild. Pie safe, end table, chest, or an old wooden fram. They're all great conversation pieces when you add a bit of your personality to them.
Day one: Sand, sand, sand! If your old piece of furniture has any paint, poly, or finish, save yourself the trouble and grab a sander. My starting pie safe had a coat of poly on it that was about 35 years old. I literally had the piece sanded down to the wood in less than 90 minutes...a quick wipe down, and I'm ready for Day #2.
Day two: OK, I must admit that picking out paint colors is one of my all-time favorite things to do. The brighter the better--you are talking about the woman with an orange kitchen:) However, my first color green was more the preceding color to a toddler's sinus infection...so, we went for a second coat of a less-chartreause color. Don't forget to use an oil-based primer ahead of time....it makes for fewer paint coats. Let is dry completely overnight!
Day three: Sandpaper in tow, it's now time to mess up your painting! Sand the edges, rough up the finish...anything to make it look worn. Use your judgement here--I used a bit of steel wool around the detail to make sure that it looked a bit worn. After a quick wipe down when you're content with your amount of wear, it's time to sponge on a stain. (I used Minwax dark walnut). Again, you'll can apply this as dark or as lightly as you'd like--just make sure that you're consistent!


A quick dry overnight, adding new hardware...and I have an extremely fun addition to my already very bright kitchen--and it cost me less than $25.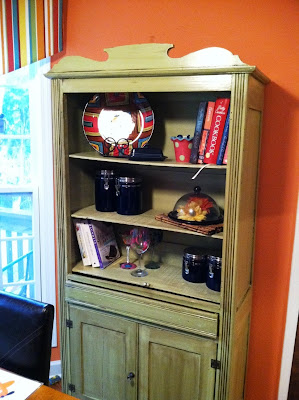
2 comments:
Love Love Love!!
I am going to send you a picture of a pine armoire that we have. It is almost 7 feet tall (no joke) and heavy as crap. We did have our old TV in it before we did the wall thing. I am begging Jason to let me paint it…I think I've almost got him convinced. Our problem is we have no good place for it here. I'm hoping to have a better function for it in our next house. We are planning on putting the house on the market this spring so we haven't done much to anything in our house. This piece is so big that we just threw it in our dining room so I would have a place for platters, China, etc. I'll email it to you and tell me what you think!
Post a Comment